
Type S backup cameras enhance vehicle safety, offering a clearer view during reversing maneuvers․ Understanding the camera’s manual is crucial for optimal performance and proper utilization of features․
What is a Type S Backup Camera?
A Type S backup camera represents a significant advancement in vehicle safety technology, designed to assist drivers during reversing operations․ These systems typically consist of a camera mounted on the rear of the vehicle, connected to a display screen usually integrated into the dashboard․ The camera captures a live video feed of the area directly behind the vehicle, providing a wider field of vision than traditional mirrors alone․
The “Type S” designation often indicates specific features or compatibility standards․ Consulting the Type S backup camera manual is essential to understand the unique capabilities of your particular model․ This manual details the camera’s specifications, including resolution, viewing angle, and any special features like parking guidelines or obstacle detection․ Proper understanding, as outlined in the manual, ensures safe and effective use․
Benefits of Using a Backup Camera
Employing a Type S backup camera offers numerous advantages, significantly enhancing driver safety and convenience․ Primarily, these systems drastically reduce blind spots, minimizing the risk of accidents while reversing․ The camera provides a clear view of potential obstacles – children, pets, or objects – often missed by mirrors․ Referencing your Type S backup camera manual will detail specific features like dynamic parking lines, aiding in precise maneuvering․
Beyond safety, backup cameras simplify parking in tight spaces․ The manual will explain how to interpret the displayed image and utilize any available gridlines․ Furthermore, some systems offer features like distance indicators․ Always heed warnings within the manual regarding limitations; a camera isn’t a substitute for careful observation․ Proper use, guided by the manual, maximizes these benefits․

Understanding the Manual
Type S backup camera manuals provide essential information regarding installation, operation, troubleshooting, and safety; Careful review ensures correct setup and optimal system performance․
Importance of Reading the Manual
The Type S backup camera manual is your primary resource for maximizing the system’s benefits and ensuring safe operation․ Ignoring it can lead to improper installation, potentially damaging the camera or vehicle’s electrical system․ A thorough understanding of the manual’s instructions prevents frustrating troubleshooting scenarios later on․
Furthermore, the manual details crucial safety precautions, like recognizing the camera’s limitations and avoiding complete reliance on its view while backing up․ It outlines proper cleaning procedures – specifically advising against scratching the lens – to maintain image clarity․ The manual also explains how to interpret the display screen and understand any error messages that may appear, allowing for swift and effective problem-solving․ Ultimately, reading the manual empowers you to use your Type S backup camera system correctly and safely․
Locating Your Type S Backup Camera Manual
Finding your Type S backup camera manual is the first step towards understanding its features․ Initially, check the packaging that accompanied the camera system; the manual is typically included within․ If you’ve misplaced the physical copy, many manufacturers offer digital versions on their official websites․ Search for your specific model number to locate a downloadable PDF․
Alternatively, online retailers where you purchased the camera may provide a link to the manual․ Some systems utilize a shared manual for similar models, so explore related product pages․ Remember to note the ‘START DATE’ of the manual, as indicated in some documentation (e․g․, 2009/NOV/19), to ensure you have the most current version․ If these methods fail, contacting the manufacturer’s customer support directly is recommended․

Installation Guide
Careful installation, guided by the Type S manual, is vital for optimal performance․ Refer to the wiring diagram and avoid forceful methods like hammering․
Preparing for Installation
Before beginning, thoroughly review the Type S backup camera manual․ This ensures a smooth and correct installation process, preventing potential damage or malfunctions․ Gather all necessary tools – screwdrivers, wire strippers, and potentially a multimeter – as outlined in the manual․
Disconnect the vehicle’s negative battery terminal to prevent electrical shorts during wiring․ Carefully plan the camera’s mounting location, considering the desired field of view and avoiding obstructions․ Inspect all components included in the package against the manual’s parts list․
Familiarize yourself with the wiring diagram, understanding each wire’s function․ Ensure the vehicle’s electrical system is compatible with the camera’s power requirements․ Protect the vehicle’s interior and exterior surfaces to avoid scratches during installation․ A well-prepared workspace contributes to a successful installation․
Wiring Diagram and Connections
The Type S backup camera manual provides a detailed wiring diagram crucial for correct connections․ Typically, you’ll identify wires for power (positive and negative), video signal output, and potentially trigger wires for automatic activation when shifting into reverse․
Connect the camera’s power wires to a suitable 12V power source, ensuring correct polarity․ The video output wire connects to the display screen, often via an RCA connector․ The reverse trigger wire links to the vehicle’s reverse light circuit, activating the camera when the gear is shifted․
Secure all connections with wire connectors or electrical tape to prevent shorts․ Refer to the manual’s diagram for specific wire colors and their corresponding functions․ The rear view camera input is usually located on the back of the unit․ Double-check all connections before restoring power․
Mounting the Camera
The Type S backup camera manual details proper mounting procedures for optimal viewing angles and secure attachment․ Select a mounting location that provides a clear, unobstructed view of the area behind your vehicle, typically near the license plate or rear bumper․
Utilize the provided mounting hardware – screws, brackets, or adhesive pads – ensuring a firm and stable installation․ Avoid forceful installation methods like hammering, as this can damage the camera․ Carefully route the camera’s wiring through existing vehicle openings to prevent damage or interference․
Ensure the camera lens is clean and free from obstructions before final mounting․ Tighten all screws securely, but avoid over-tightening․ Refer to the manual for specific mounting recommendations based on your vehicle model․
Connecting to the Vehicle’s Electrical System
The Type S backup camera manual provides a detailed wiring diagram for connecting the camera to your vehicle’s electrical system․ Typically, this involves connecting the camera’s power wire to the reverse light circuit, ensuring the camera activates only when the vehicle is in reverse․

Carefully identify the correct wires using a multimeter and consult the vehicle’s wiring schematic; Securely connect the wires using butt connectors or solder, insulating each connection with electrical tape․ The manual specifies the correct polarity for power and ground connections․
Avoid splicing into critical vehicle systems․ Improper wiring can damage the camera or vehicle’s electrical system․ If unsure, consult a qualified automotive electrician for assistance․

Operating Instructions
Type S backup camera manual details powering on/off, angle adjustments, and display screen interpretation․ Proper use ensures optimal visibility and safe reversing procedures․

Powering On/Off the Camera
Understanding the power functions of your Type S backup camera, as detailed in the manual, is essential for efficient operation․ Typically, the camera activates automatically when the vehicle is shifted into reverse gear, drawing power from the vehicle’s electrical system․ However, some models may feature a dedicated power button for manual activation, allowing for a view even when not reversing․
The manual will specify the location of any power switch and its function․ It’s important to note that prolonged manual operation can drain the vehicle’s battery, so use it judiciously․ To power off, either shift out of reverse (for automatic activation) or utilize the manual power switch if equipped․ Always refer to your specific Type S backup camera manual for precise instructions, as variations exist between models․
Adjusting Camera Angle and Settings
Your Type S backup camera manual will detail how to optimize the camera’s view for your vehicle․ Most systems allow for angle adjustments during installation to ensure a comprehensive rear view․ Some advanced models offer electronic angle adjustments via the display screen, accessible through the settings menu․
Settings often include brightness, contrast, and guide line adjustments․ Guide lines assist with parking and maneuvering, and can often be toggled on or off, or customized to match your vehicle’s width․ The manual will explain how to navigate these settings․ Carefully follow the instructions to avoid distorting the image or compromising the camera’s functionality․ Proper adjustment ensures maximum visibility and safety while reversing․
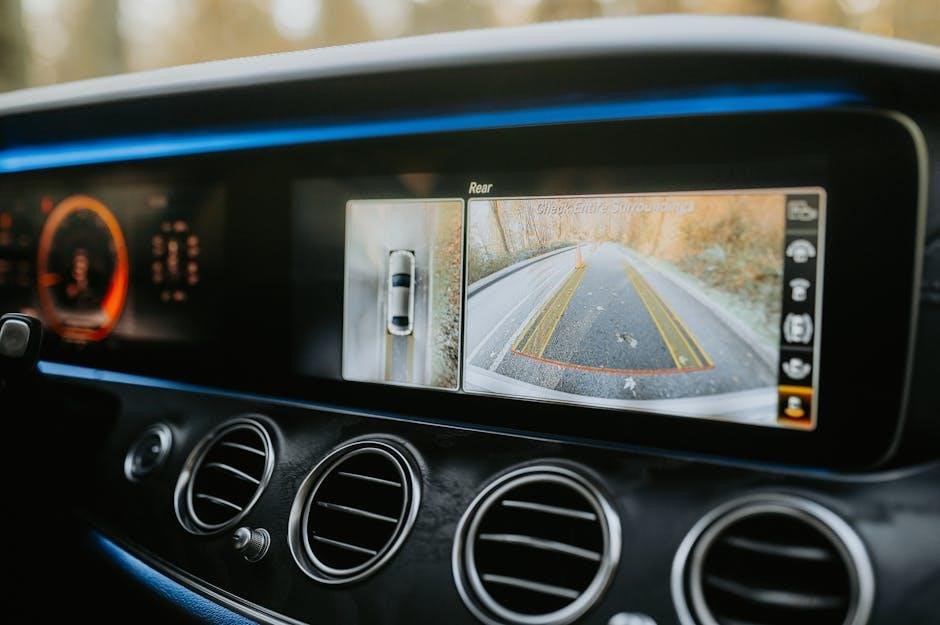
Understanding the Display Screen
The Type S backup camera’s display screen is your primary interface for viewing the rear environment․ Your manual will illustrate the screen’s layout, identifying key elements like the camera view, guide lines, and any status indicators․ Some displays feature adjustable brightness and contrast settings for optimal visibility in varying lighting conditions․
Pay attention to any on-screen messages or icons, as these may indicate system status or potential issues․ The display might also show distance markings or object detection alerts, depending on the camera’s features․ Refer to your manual for a detailed explanation of all display elements and their functions․ Familiarizing yourself with the display ensures you can quickly and accurately interpret the camera’s view․
Interpreting the Camera’s View
The Type S backup camera provides a visual representation of the area behind your vehicle․ However, it’s crucial to understand its limitations․ The camera’s field of view may not encompass the entire rear area, and objects at the extreme edges can appear closer or further than they are․ Your manual details the camera’s viewing angle․
Pay close attention to the guide lines displayed on the screen, which assist in judging distances and maneuvering․ Remember these are visual aids and don’t replace careful observation․ Always check your surroundings and use mirrors in conjunction with the camera․ Be aware of potential obstructions not visible on the screen, and never solely rely on the camera while backing up․

Troubleshooting Common Issues
If issues arise, consult your Type S backup camera manual for solutions․ Common problems include no image, distorted views, or a non-responsive camera—address these promptly․
No Image on the Display
Experiencing a blank display screen? First, verify the camera is receiving power – check the vehicle’s electrical system and associated fuses as detailed in your Type S backup camera manual․ Ensure all wiring connections, particularly the rear view camera input on the back of the unit, are secure and properly connected according to the wiring diagram․
Confirm the camera isn’t simply switched off; some systems have an on/off function․ If the problem persists, consult the manual’s troubleshooting section for specific error codes or diagnostic steps․ A faulty display unit or a damaged camera itself could also be the cause, requiring professional inspection․ Remember, improper installation, like hammering during mounting, can damage components․
Distorted or Blurry Image
A distorted or blurry image on your Type S backup camera display often indicates a simple fix․ Refer to your camera’s manual for instructions on adjusting the camera angle and settings; improper alignment can significantly impact image quality․ Critically, do not touch or scratch the camera lens, as this can cause permanent damage and distortion․
Ensure the lens is clean and free of debris – use a soft cloth․ Check for any obstructions blocking the camera’s view․ If the issue continues, review the wiring connections; a loose connection might cause signal interference․ The manual may detail specific troubleshooting steps for image quality issues, potentially indicating a need for software updates or firmware adjustments․
Camera Not Responding
If your Type S backup camera is completely unresponsive, consult the manual for specific troubleshooting guidance․ First, verify the camera is receiving power; check the vehicle’s electrical system and associated fuses as detailed in the manual’s wiring diagram․ Ensure all connections are secure and haven’t become dislodged․
The manual may outline a reset procedure for the camera system․ If the camera still fails to respond, investigate potential software glitches․ Look for instructions regarding software updates or firmware adjustments․ Remember, attempting installation “by hammering in” is strictly prohibited and will void any warranty․ Contact customer support if the issue persists, referencing your camera model and manual for efficient assistance․
Error Messages and Codes
Your Type S backup camera system may display error messages or codes on the screen, indicating specific problems․ The manual contains a dedicated section listing these codes and their corresponding meanings․ Carefully consult this section to accurately diagnose the issue․
Common errors might relate to signal interference, camera malfunction, or wiring problems․ The manual will guide you through potential solutions for each code, ranging from simple checks like cable connections to more complex troubleshooting steps․ Note the “Start Date” and “Start Time” information logged by the system, as this may be relevant when contacting support․ Avoid touching or scratching the camera lens, as damage can occur․ Referencing the manual’s diagrams is crucial for accurate interpretation․

Maintenance and Care
Regular cleaning of the camera lens ensures optimal image clarity․ The Type S manual advises against scratching the lens and emphasizes protecting it from physical damage․
Cleaning the Camera Lens
Maintaining a clear view is paramount for your Type S backup camera’s effectiveness․ The user manual strongly advises against any actions that could potentially damage the delicate lens․ Avoid touching the lens surface with your fingers, as oils and contaminants can quickly accumulate, leading to a blurry or distorted image․
For routine cleaning, use a soft, lint-free microfiber cloth․ Gently wipe the lens in a circular motion to remove dust, dirt, and grime․ If necessary, lightly dampen the cloth with distilled water – never use harsh chemicals, abrasive cleaners, or solvents, as these can permanently damage the lens coating․
Ensure the camera is powered off during cleaning․ Inspect the lens regularly for any scratches or damage․ Promptly address any issues to maintain optimal performance and safety while reversing your vehicle․ Following these simple steps, as outlined in your Type S manual, will ensure years of reliable operation․
Protecting the Camera from Damage
Your Type S backup camera is a precision instrument requiring careful handling․ The manual explicitly warns against forceful installation methods; do not attempt to install the camera by hammering or applying excessive pressure․ This can cause internal damage, rendering the system ineffective and potentially unsafe․
Shield the camera from extreme weather conditions whenever possible․ While designed for outdoor use, prolonged exposure to intense sunlight, heavy rain, or snow can degrade performance over time․ Regularly inspect the camera housing for cracks or loose connections․
Be mindful of potential impacts during parking or maneuvering․ Avoid bumping into objects that could damage the lens or housing․ Following these preventative measures, detailed in your Type S manual, will help ensure the longevity and reliability of your backup camera system, providing years of enhanced safety and convenience․
Software Updates and Firmware
Maintaining up-to-date software and firmware is vital for optimal Type S backup camera performance․ Check the manufacturer’s website regularly for available updates, as these often include bug fixes, improved functionality, and enhanced compatibility with newer vehicle models․ The manual may detail specific update procedures․
Updates are typically delivered via USB or, potentially, over-the-air (OTA) depending on your camera model․ Carefully follow the instructions provided with the update file to avoid interrupting the process, which could damage the system․ Back up any critical settings before initiating an update, if the option is available․
Firmware updates can improve image quality, responsiveness, and overall system stability․ Ignoring these updates may lead to reduced performance or compatibility issues․ Refer to your Type S camera manual for detailed guidance on checking for and installing the latest software versions․

Safety Precautions
Always prioritize direct visual checks alongside the camera’s view; it has limitations․ Never rely solely on the system while backing up your vehicle․
Avoiding Obstacles While Backing Up
Your Type S backup camera is a valuable aid, but not a replacement for careful observation․ Always visually confirm your surroundings before and during reversing․ The camera’s field of view has limitations, and may not detect low or distant obstacles․
Refer to your Type S backup camera manual for specific details regarding the camera’s range and potential blind spots․ Pay close attention to the guidelines displayed on the screen, but remember these are estimations and may not perfectly align with actual obstacles․
Slowly and cautiously back up your vehicle, especially in unfamiliar areas or when children or pets are present․ Be mindful of objects that may be difficult for the camera to detect, such as curbs, small objects, or uneven terrain․ Never assume the camera has identified everything in your path․
Limitations of the Backup Camera System
The Type S backup camera system, as detailed in your manual, is designed to assist, not replace, safe driving practices․ Its effectiveness is impacted by several factors․ Image quality can degrade in low light, heavy rain, or snow, reducing visibility․ The camera’s range is finite; objects beyond a certain distance won’t be displayed․
Furthermore, the system may struggle with extremely low or very high obstacles․ The displayed guidelines are estimations and don’t account for moving objects․ Your Type S backup camera manual emphasizes the importance of physical head checks․
Remember, the camera cannot detect all potential hazards․ Always prioritize visual confirmation and proceed with caution when backing up, regardless of the system’s assistance․